BrainSqueezer Coregistration Demo
BrainSqueezer lets you perform "coregistration by eye", which is especially useful for incorrigible cases where an automated approach just cannot get the job done. Some examples where an automated approach will fail are:
- There is an artifact due to some aspect of data acquisition, such as a drop-out artifact encountered in some fMRI studies
- The data are very noisy
- There is an abnormality such as a tumor or stroke
- One of the data sets does not cover the entire brain, e.g. part of the cerebellum or the posterior half of the brain is missing.
BrainSqueezer's approach is entirely user-guided, or "by-eye". BrainSqueezer never ever never compares two data sets or tries to optimize a coregistration fit. It does, however, provide visualization tools that let the user compare two data sets, and furthermore provides tools to let the user find an optimal fit. Brainsqueezer then uses an IDL-based approach to reslice the object image according to the user-specified parameters.
BrainSqueezer uses a trilinear interpolation via IDL's "INTERPOLATE" function. The basic algorithm was generously provided by John Votaw.
Control menu:
On the left-hand side of the BrainSqueezer GUI is a control panel that is always visible. This menu lets you move between the Filename, Image, and Histogram menu, and lets you change parameters for reading and displaying images.
| The top menu controls the display. Options include the filename menu, the images, and histograms of each of the images. Selecting the "images" option will cause all of the image files in the filename menu to be read in, and the images will be displayed. |
|
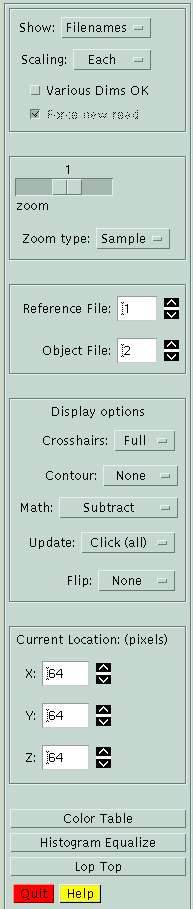 |
The "Scaling" parameter controls how the images will be scaled once they are read in. "Each" indicates that each image will be scaled into the range 0-255, and converted to 8-bit data. "None" (the default) will keep the original data values, but the display update will be slower. "Globally" will scale allof the images to the same global min and max.
You may unselect "Various Dims OK" if all files should have the same dimensions as the first file, so different-dimensioned files will be removed from the filename list. The default is to allow files of different sizes.
|
|
|
|
|
| The "Zoom" parameter controls the size of the displayed images. If your images have even dimensions, you can select "-2" to zoom by 1/2. |
|
|
|
|
|
| The "Reference" file is the target image you are trying to register to; the "Object" file is the image volume you want to move around.
The Reference and Object designations have two other purposes: (1) the "Math image" is created by doing e.g.
[Ref - Obj] = Math
and (2) the contours are usually based on the Reference image.
|
|
| The pulldown menus in this section let you set various parameters. Most are self-explanatory.
The "Math" menu lets you perform various mathematical operations between the Reference and Object images, e.g. subtraction, division (ratio), multiplication, etc.
"Update" refers to how frequently images are updated. Options include updating when the cursor is moved, or for a mouse click, or updating the current value for a cursor move but the image display only for a mouse click.
The "Flip" option lets you flip the display of all of the images so you don't have to look at upside-down pictures. Note that this is different from flipping the data itself (see below).
|
|
|
|
| The Current location shows the location within the Reference image volume. The first row, column, plane is [1, 1, 1]. Clicking within any image moves the current location to that point and updates all of the images.
You can also move to a specific location by typing a value into the text boxes.
|
|
|
|
|
|
|
|
|
|
|
|
File Menu
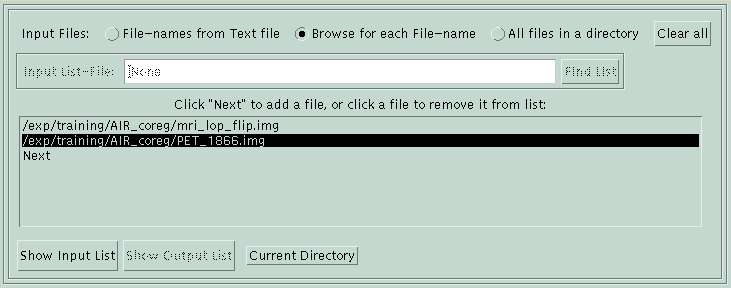
The file menu is visible when you open BrainSqueezer. You must load at least one file before moving to the image or histogram menus. To load a file, click on the word "Next" to browse for a file. To remove a file from the list, click on the filename. You can load all "*.img" files in a single directory by clicking "All files in a directory" and browsing for one of the files there.
The default is that files of different dimensions are allowed. If you want, you can specify that only files with the same dimensions should be loaded, which will speed up the display. If you choose this option, prior to moving to the image menu, BrainSqueezer checks all of the files to make sure they are the same size as the first file. Any that are a different size are removed from the list. You can read in files of different sizes (which is what you really need a coregistration program for anyway!) by clicking the check-box "Various dims OK" in the main menu. Doing this, of course, is more computationally intensive and takes more time. BrainSqueezer does its very best to squeeze, stretch, etc. each of the "various dims" files to be in the same space as the first file. You can expect a very modest amount of smoothing, although frequently it is not apparent.
To actually read in the files, you need to move to the "Image" menu. Do this by selecting the "Show -> Images" pulldown menu. Occasionally BrainSqueezer may not read in new images, for instance if you substitute one image for another. If this happens, simply click the "Force new read" box to force BrainSqueezer to read in all of the files when it moves to a new menu. THis can take a lot of time if you are moving between e.g. the "Images" and "Histogram" menu a lot, so you will probably want to uncheck this box after your images have been read in.
Image Menu
The image menu appears as in the following picture:
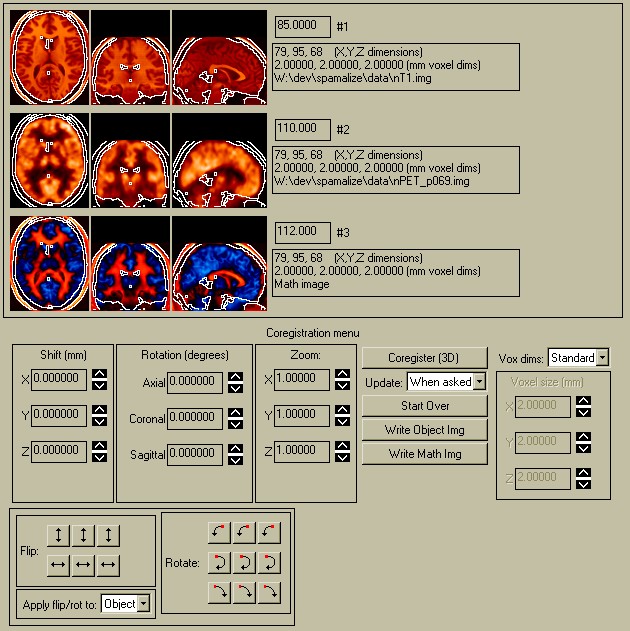
Each of the individual parts are discussed in the following sections.
The picture above shows a typical BrainSqueezer display. The top row shows the Reference image (#1), high-resolution MRI image. The bottom row shows the Object image (#2), a FDG PET scan. Both images come from the same person.
The crosshairs show the current location. The red crosshair shows the same line in both the axial and coronal views; the green and blue crosshairs show the same line in their corresponding view pairs. The PET data file was originally much smaller than the MRI data file: PET=128 x 128 x 35 pixels, 1.875 x 1.875 x 4.25 mm pixel size; MRI=256 x 256 x 124 pixels, 0.9 x 0.9 x 1.1 mm pixel size. When first displayed, the PET image appeared much smaller than the MRI image, because BrainSqueezer matches the images at the lower left-hand corner and then displays the images "as-is", without correcting for the pixel size. Clicking the "Coregister" button will create a new Object image with the same dimensions as the Reference Image, which will then be displayed with a voxel-by-voxel match. This effectively expands the PET data to match the same scale and aspect ratio as the MRI images, although the brains are obviosly not yet coregistered.
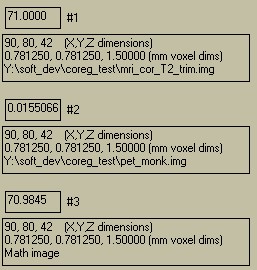
To the right of the images is some information about each of the images, as shown below:
| The top box shows the current value under the cursor. Next to it is the number of the image within this BrainSqueezer session. |
|
 |
|
| The next two lines show the image volume dimensions (pixels) and the pixel dimensions (mm). These values may change as you perfrom various coregistrations.
The final line for each image shows the filename. (There is no filename for the Math-Image.)
|
|
|
|
|
|
Image Math
Below the images you read in is an additional image, the so-called "Math" image (shown in the picture at the top of this section). This is the result of whatever mathematical operation is currently requested in the main menu by the "Math" pulldown menu. The default is "Subtract", which means the Object image is subtracted from the Reference image. This can be quite helpful in determining how well two image sets line up. You can also use the Math image as a general-purpose image math module, since you can add, multiply, divide, and perform hybrid operations with masks.
At any time, you can write to a file the current Math or Object Image. You may select a file format from ANALYZE, AFNI, or EZZ.
Coregistration Menu
Below the images is the Coregistration Menu (also on the image menu), shown below. Some coregistration operations become dicey of only a single image file has been read.
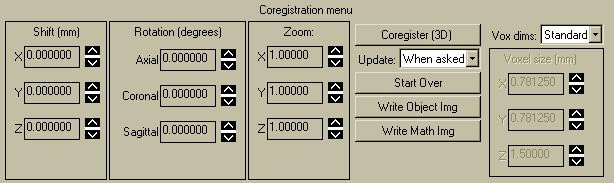
The coregistration menu lets you move the Object image. You can apply a translational shift in x, y, and z, specified in mm. The "rotation" parameters let you rotate the volume about any one of the three cardinal axis. For instance, to rotate 10 degrees clockwise (CW) about the z-axis (the blue line in the images above), type "10.0" into the "Axial" textbox. The "Zoom" parameter lets you magnify (>1) or minify (<1) the image volume along each of the cardinal directions.
The "Update" dropdown menu lets you specify that a coregistration and subsequent new display occur either "when asked", i.e. by clicking on the "Coregister" buttons, or else "for change", i.e. whenever you change one of the shift, rotate, or zoom parameters. Using the "for change" option is handy if you want to quickly figure out what direction to go in. With the "for change" option, the desired reslice is only performed on the three orthogonal slices; the 3D volume is NOT resliced, so some operations can appear confusing if the 3D volume is suddenly displayed. For example, if you click on one of the images to change the location, the most recent 3D volume will be displayed, which is probably different than the 2D slices you just had up. To remedy this, click "Coregister" to reslice the Object image using the current parameters. The 2D slices should show the same results as reslicing the 3D volume and extracting the desired slices, except the 2D approach is much faster.
You can select what voxel dimensions you want the resliced image to volume to have, using the "Vox dims" pulldown menu. The default is "Standard", which means the resliced voxels will have the same dimensions as the target image. Choose this option if you want to coregister the object volume to the target volume. You can select "Object" to preserve the voxel sizes of the object image. "Cubic" will determine the smallest pixel dimension (of X,Y,Z) and the resliced image volume will have pixels which are cubic, with all three pixel dimensions having the same (smallest) dimension. Lastly, you can select "Custom", which lets you type in whatever pixel sizes you want in the box on the lower right.
When you have a set of coregistration parameters you like, click on "Write Object Image". You can also write out the Math Image. Clicking on "Start Over" will read in the current object image from its original file and redisplay it as it was at the beginning. All transform parameters will be set to their original values as well.
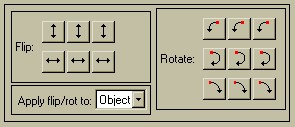
The "Flip / Rotation" menu lets you flip and rotate the image data. You are not merely changing the display, you are changing the data itself. This is handy for initially lining up images which were acquired in different orientations. When you write the Object- or Math-Image, it will be written in its current Flipped or Rotated form. There is are five sets of buttons: 2 flips (Up/Down and Left/Right) and three rotations (90 degrees CW, 90 degrees CCW, and 180 degrees). There are three buttons for each set. The left button will apply the action to the left-most image (usually axial), the center button will apply the action to the central image (usually coronal), and the right button will apply it to the right-most image (usually sagittal). For example, to rotate an axial image clockwise about the z-axis by 90 defgrees, click the lower left rotate button.
The default is to apply yhe flip or rotation to only the Object-Image, but you can also apply it to ALL of the images by selecting "All" from the "Apply flip/rot to" pulldown menu.
Histogram Menu
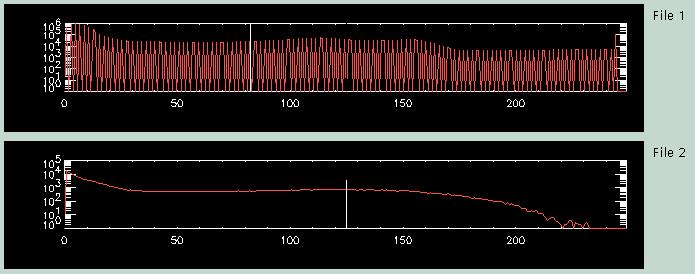
The third menu page shows a histogram for each of the image files. The top histogram for "File 1" corresponds to the MRI file, the bottom histogram ("File 2") to the PET data. The vertical white line near the center of each histogram shows the currently selected threshold for that image volume. The threshold is used to create the contours that can be overlaid on the images. Typically, a set of contours is created from the Reference image, and this single set of contours is overlaid on all of the other images. If desired, you can also create a set of contours for each image, and overlay each images' contours on itself (although the latter is not very helpful...). The default is to position the threshold in the central bin of the histogram.
You can change the location of the threshold by clicking on the histogram at the desired location. On some computers, particularly Macintoshes, the vertical white line does not show up. Have the courage of your convictions and boldly click where you want the new threshold- the threshold will change, even if the histogram display does not!
Returning to the image menu will cause the new contours to be displayed, if you have selected a contour option.
Before you go back and forth between the histogram and image menus, you should deselect the "Force new read" button in the main menu. This option is present because the file-name menu is only loosely coupled to the rest of BrainSqueezer; in particular, BrainSqueezer cannot discern when a file has been added or removed from the list, so by default it reads in all of the files whenever you move to the histogram or image menu. This will get annoying, but you can turn it off. However, if you do then read in a new file, you must remember to re-check "Force new read".
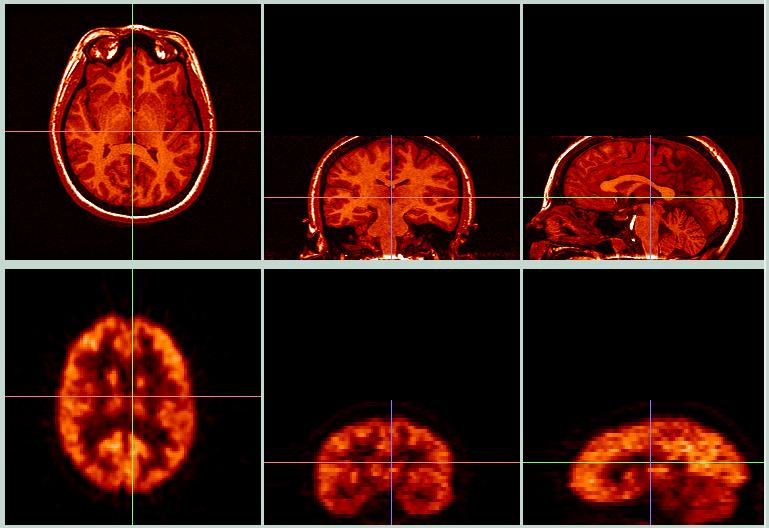
Before Coregistration.
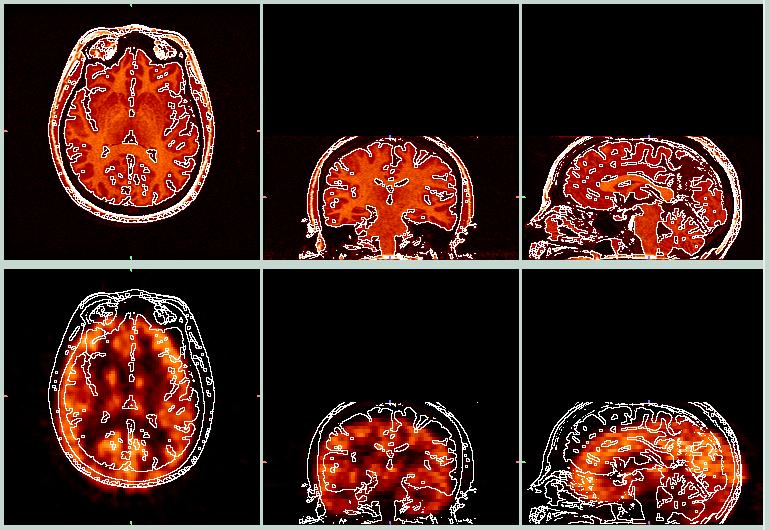
The images above show a contour created from the MRI data, superimposed on both the MRI and PET data. It is obvious that the PET data (bottom row) do not match the MRI data very well. By playing with the shift, rotation, and zoom parameters, we can squeeze the PET data into the MRI image space, as shown below.
After Coregistration

The above images show a pretty fair coregistration between the PET and MRI data. The parameters I arrived at are:
x_shift = -6.0, y_shift = -12.0, z_shift = -15.0
axial_rot = 0.0, coronal_rot = 0.0, sagittal_rot = -18.0 (degrees)
x_zoom = 1.0, y_zoom = 0.94, z_zoom = 0.95
If you click "Write Object Image" after performing a coregistration, BrainSqueezer will write the coregistered image to the same directory as the original Object file, with a similar filename but with "_coreg" appended. The image and pixel dimensions of the coregistered image will be preserved; the written volume will not necessarily match the original image. Which is usually what you want.
The main BrainSqueezer page shows an example of coregistering a monkey brain where several automated routines failed, but BrainSqueezer prevailed! Another webpage shows a challenging example of coregistring a partial brain PET scan from a monkey to a full MRI scan from the same monkey. The AIR Coregistration demo shows several examples of images created using BrainSqueezer.