This webpage describes how you should set up the directory structure (data storage scheme) for a neuroimaging study at the Waisman Brain Imaging Lab. Most newer studies here are currently set up along these lines. Deviations from this suggested approach will be met with chuckles, expressions of disbelief, and mild abuse when you attempt to analyze your data down the road. After we are done laughing at your expense, you will receive some reading material so you can bump your computer programming skills up a notch- this will come in handy as you get yourself out of the hole you dug. If you are new to unix/linux, you should read John Koger's introduction to unix. Then peruse the Python intro and Python code examples.
There are several goals in establishing a uniform data storage strategy for the lab:
Original data from all subjects must be stored in a separate directory. This directory should not contain any processed data, and the data contained here should never ever be altered. This is your reference data set for when things go south. If this seems burdensome, we suggest that as a warm-up exercise you unarchive a large, poorly organized data set acquired over several years. As army drill sergeants are fond of saying, "I can't make you do something, but I can sure make you wish you had.".
Different sorts of data require different sorts of processing. However, each type of data (fMRI, MRI-anatomicals, DTI, PET, etc) usually are processed similarly across studies, more so at the second (across subjects) level of analysis.
It is the policy of the lab not to store any personally identifiable information, particularly subject contact information, on the study drive. This should be stored on removable media (disk, CD, etc.) that you remove from your computer when not needed and store in a locked filing cabinet.
The best way to meet the subject confidentiality and/or HIPPA requirements is to not include any personally identifiable information in the data to start with. You should strenuously avoid including the subject's name, initials, birthdate, etc. in the acquisition description. Remind the scanner technician not to type this information into the scan setup.
Your study will be assigned a name on the "study" drive, e.g.:
/study/mystudy/
In the top-level directory belongs summary descriptors of the study, and a few directories.
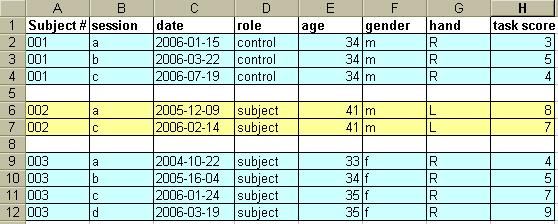
The study summaries are usually Excel files containing a row for each scan session for each subject, and columns with scan file names, scan dates, subject number, covariates of interest, etc.
Suggested top-level directory names within "/study/mystudy/" include:
A generic directory strucure within "/study/mystudy/" is outlined below. The full structure is only shown for subject 1, additional subjects are included to show where they are placed. Directory names end with a slash "/", ordinary filenames do not.
Contrary to the introductory paragraph at the top of the page, you do not need to slavishly follow this scheme, but rather use it as a guide and think through how you plan to analyze your data before you acquire the first data set. Usually there are changes and additions as a study proceeds, and these can be added to this schema in a rational way.
The data/ directory
The "data" directory should contain several subdirectories containing data in various stages of processing, up to but not including activation maps. Most or all subsequent processing will refer to images stored in "data/proc/". One benefit of organizing the data like this (instead of e.g. with subject number at the top) is that it will be easy to archive the original data directories (data/raw/ and data/orig/) to save disk space, and to unarchive them if needed later. If the data are organized primarily by subject, it is more difficult to archive individual subdirectories for e.g. the original data.
data/
The "analysis" subdirectory contains activation maps or other types of analyzed, reduced data for each subject. It also contains second-level or group analysis results. There should be a primary software tool used for analysis (e.g. AFNI, FSL, fmristat), but if you want to use other additional tools, just make a parallel subdirectory for each subject.
Some software prefers that each secondary analysis be placed in a single unique directory, while other software permits multiple secondary analysis results in the same directory. Either way, you should come up with succinct but descriptive names for the directories and files.
analysis/ (analyzed or reduced data)
However you choose to organize your data, it is imperative that you create a text and/or Excel file describing your naming convention and with as much detail as possible about each type of data. You should be able to write the Methods section for your papers and grants by copying from the text file. A new person coming into your group should be able to read this description and start analyzing data immediately, since it should be quite clear what every file is.
An example of an Excel file containing study descriptors might look something like this:
Data analysis will be much easier if you plan from the beginning to use scripts or batch-type analysis. The Excel file will be the link between your data and the associated useful information. For example, suppose you want to extract region-of-interest (ROI) information from all of the male controls' gray-matter probability images. Using the directory scheme outlined above, the gray matter probability map for each subject would be stored as follows:
/study/mystudy/analysis/sub001/anat/seg/GM_prob.img
/study/mystudy/analysis/sub002/anat/seg/GM_prob.img
/study/mystudy/analysis/sub003/anat/seg/GM_prob.img
The only thing that changes in the directory name is the subject number. So, a Python script could easily search the Excel file (or, more likely, an associated comma-delimited text file) and return subject numbers which are a) male and b) controls. These subject numbers could then be plugged into another script to iteratively exam ROIs in the desired gray-matter probability map. This second script needs to know something about your directory structure. Suffice it to say that for this scheme to work the data need a consistent naming convention.
From the point of view of scripting, the directory convention does not matter much. For example, it is just as easy to extract the same data if the subject number is the primary organizing directory:
/study/mystudy/sub001/anat/analysis/seg/GM_prob.img
/study/mystudy/sub002/anat/seg/analysis/GM_prob.img
/study/mystudy/sub003/anat/seg/analysis/GM_prob.img
Just be consistent across subjects and as much as possible across modalities.
It is convenient to add short phrases or characters to a file name as it is proceeds through a processing pipeline, so you can easily determine what has already been done to it. Descriptive phrases (e.g. "coreg", "motioncorrected") are the most helpful, but filenames grow unwieldy after several steps. SPM has developed a series of single-letter codes which it prepends to the filename after each step. The problem with this that the alphabetic order changes with every step/addition, so it is difficult to follow the steps for a single subject.
We have adopted a similar approach, but the code letters get appended to the end of the base filename, before the ".". The first step is to reduce the original filename to a minimal length. If it is a T1-weighted MRI image, something like "T1.img" is usually appropriate. If there is more than one T1 scan per subject, you will have to be moderately clever. For each subsequent step, append a letter after the characters "T1". The following code has been found useful:
B .... Brain-extracted (aka "skullstripped).
L .... Lop-top, where the upper 0.5% of data values are set to the 99.5%ile value, to improve the dynamic range for data values of interest. Do NOT perform this on quantitative data, e.g. PET, or semi-quantitative data, e.g. t-values or tissue probability maps.
S ... Sum, designating a voxelwise sum-image created by summing over multiple time-frames.
C .... Coregistered. Modifiers after the C indicate how or to what the image was coregistered. Multiple modifiers can be combined.
M .... motion-corrected (within subject).
F ... Flip, as in inverting the order of rows, columns, or slices in an image. Modifiers can indicate what sort of flip was performed. If there are no modifiers, a Left/Right flip can be assumed.
Orientation: if the orientation is known, you can include a 3-letter code indicating the orientation. The following scheme was borrowed from the AFNI convention and seems to work pretty well. Only one letter from each pair should be used.
For example, "LPI" indicates the fastest-changing dimension (usually x) goes from left to right, the next fastest-changing dimension (usually y) goes from posterior to anterior, and the slowest changing dimension (usually z, aka "slice") goes from inferior to superior.
If, after seeing this extemely well thought out scheme, you want to strike out on your own, feel free. But bear in mind that your scripts will not match existing scripts, so you will have to write your own analysis scripts more or less from scratch.