VOI Manager
Introduction:
The VOI Manager is a component of BrainMaker, and lets you interact with the VOIs you make. All of the VOI operations are concentrated into this one program. The VOI Manager lets you store, rerieve, save, view information, and apply VOIs.
VOI Types
It is crucial to understand the three (3) different types of VOIs used by BrainMaker:
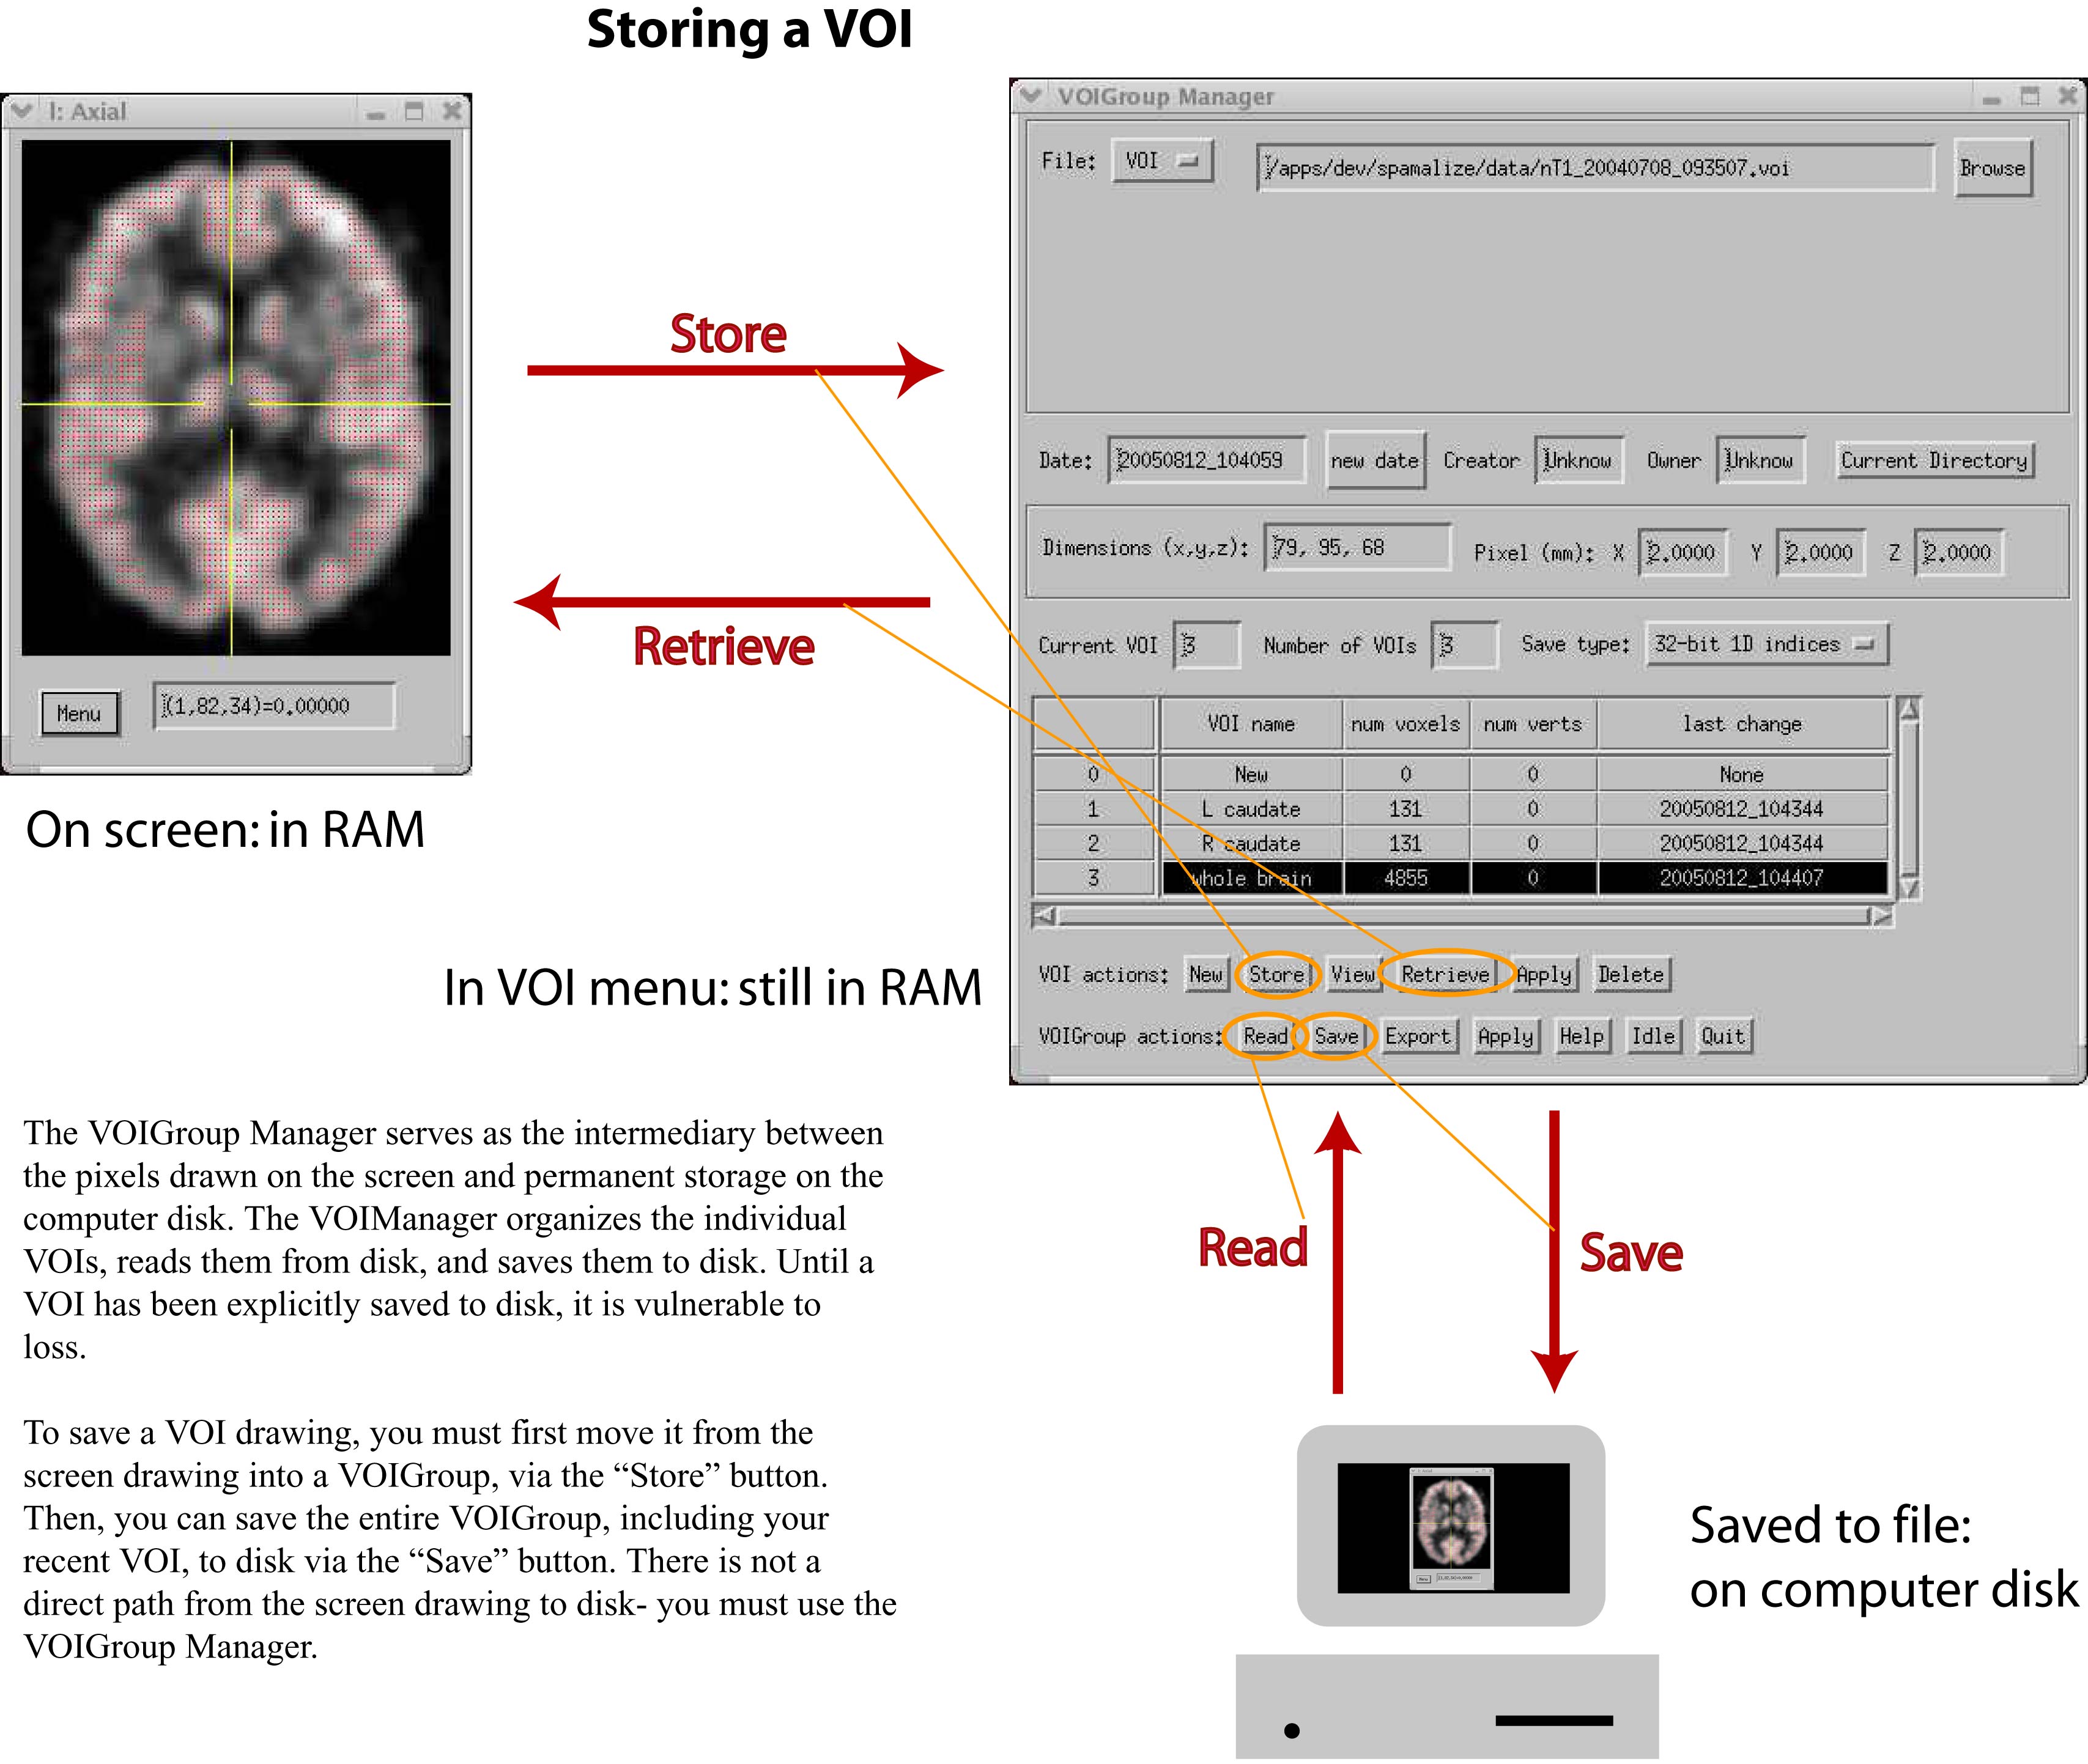
Although a VOI can be passed between these types, this does NOT happen automatically! You must explicitly request this, which usually means clicking on a button to Save, Store, Retrieve, etc. In particular, a VOI is not saved unless you click the Save button.
The working VOI is the collection of red dots visible in BrainMaker. This is the the VOI you are currently working on. BrainMaker does not care if the VOI is a single cluster or a group of unconnected clusters- all of the little red dots form a single VOI. This becomes important if, for instance, you are drawing the right caudate, and then start drawing the left caudate without erasing anything- if you now save the VOI as "left caudate", all of the voxels (including the erroneous "right caudate" ones) will be included in the "left caudate" VOI. When you get a VOI you like, you should move it into the VOIGroup.
The VOI Group is the intermediary between the working VOI and a saved *.voi file. VOIs are drawn one at a time in BrainMaker, and each one is moved into a VOIGroup. A VOIGroup consists of one or more individual VOIs, which can be overlapping. A VOI Group gets saved to a file through the VOI Manager, which is also responsible for Reading a *.voi file into a VOI Group.
A *.voi file stores a VOI Group. The file contains text-based header information about the base image used to create the VOI, to ensure that the VOIs are only applied to appropriate images.
Again, it should be emphasized that the only way to move information (VOIs) between these three types is to manually click on a button- this NEVER happens automatically. This means that although you might forget to save something and you lose some work, you never have to wonder if BrainMaker is trying to second-guess what you are doing!
VOI Manager Menu
The menu below shows the VOI Group Manager menu. There are 3 VOIs in the VOI Group (L caudate, R caudate, whole brain). The currently active VOI is "whole brain", indicated by the black bar. The various components are described below:
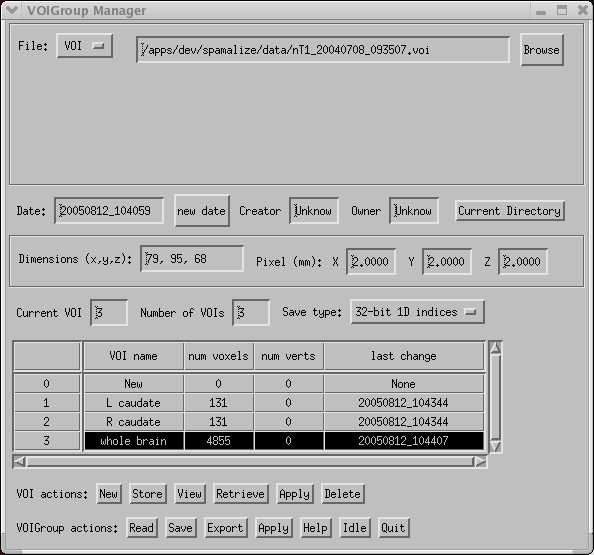
File: This is a dropdown menu with three options: VOI, Img, Appl. When you open the VOI Manager, a default name for a new *.voi file is created based on the name of the current image. (The name of this image is shown in the second dropdown menu item.) The *.voi filename includes a timestamp consisting of the year, date, and time (yyyymmdd_hhmmss), which minimizes the possiblity of overwriting a similar file. You can edit the name of the output file (make sure to hit "Return" when you are done editing). You can also browse for an existing *.voi file. After accepting the filename in the browser, it is automatically read in, a VOI Group is created, and the VOI table is filled in. The "Appl" menu is explained in detail below. Use the "Current Directory" box to jump to recently visited directories.
Date: Shows the current timestamp which will be used for writing a new file. You can update to the current time by clicking on "new date", which can help to avoid overwriting an existing file.
Creator, Owner: If multiple people are editing VOIs for a project, it can be handy to keep track of who created and/or owns a particular VOI. Type your name or initials into the box (hit "Return") to propagate this information to all new VOIs you create in this session.
Dimensions: Displays the dimensions (pixels) of the image. All VOIs within a VOIGroup must originate from an image with the same dimensions, and VOIs can only be applied to an image having the same dimensions.
Pixel (mm): Displays the pixel size of the image used to create the first VOI in the Group. A warning is given if you attempt to apply a VOI to an image with a different pixel size, but because the pixel size may get misplaced in multiple operations by external programs, this is not a deal-breaker. You can click "OK" to continue, even if the pixel sizes are mismatched.
Current VOI: Indicates the currently active VOI. All VOI actions refer to this VOI. You can change the current VOI either by typing in a new integer, or by clicking on the desired VOI in the table.
Number of VOIs: Indicates the total number of VOIs in the VOI Group.
Save type: There are 3 options for how the VOI gets saved, in increasing order of efficiency and decreasing order of portability:
Option 1, ASCII text coordinate triples, writes the VOI data as a series of X,Y,Z coordinates, with one coordinate triple for every voxel. This is a very portable format and it should be easy to figure out which pixels are in a VOI by casual inspection of the file. Hoever, this format takes up a lot of room on disk and is relatively slow to read and write. You can select this output option if you want to read the coordinates from the file into e.g. an Excel spreadsheet, or if you anticipate being marooned on a desert island with a computer that only reads ASCII text.
Option 2, ASCII text 2D indices, is also an ASCII file and so is also quite portable. However, significant savings in space is realized by indicating the VOI pixels via their 1D array indices. This scheme treats the 3D image array as a single, 1D array, with all of the voxels stretched out in a long stream of numbers. In fact, this is how the data are stored in a unix file- the "3D-ness" of the data is superimposed by knowing the image dimensions, not from any innate property of the data file itself. By only storing a single index instead of 3 coordinates, a savings of ~3x is realized in file size and read/write time.
Option 3, binary 1D indices, is the default format. This uses the 1D indexing scheme, but writes the indices in a binary format, which is considerably more efficient than ASCII format. This format is not quite as portable, since you need to make sure the byte swap issues are correct, but if you use BrainMaker this gets taken care of for you. (One of the items in the header field of every *.voi file indicates whether the data were written in Little or Big Endian format.) This option is quite a bit more compact and faster to use than either of the other two options.
Table: Every VOI in a VOI Group has its own row in the table. There are several informational columns in the table which should be self explanatory. Click on a row to highlight that VOI and to make it the current VOI.
VOI Actions: This row of buttons lets you work with individual VOIs, moving them back and forth between the VOI Group and BrainMaker's VOI (mask) display. Store and Retrieve are complementary actions. When you "Store", all the voxels in the current mask (red dots) are moved into the currently active VOI, replacing the contents (if any) of the VOI. When you Retrieve, the voxels indicated in the currently active VOI are moved to the BrainMaker mask, IN ADDITION TO any other voxels already there. This lets you move several VOIs into a working mask, then save that mask as another VOI. For example, you could retrieve "L caudate", then retrieve "R caudate", and then create a new VOI called "Caudate All", which would include both sides. (If this is confusing, march through the steps and it should become cleaerer.)
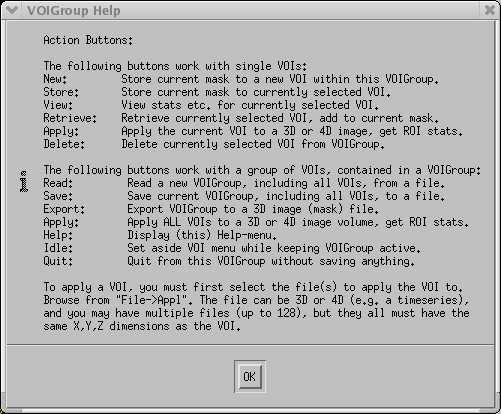
VOI Group Actions: This row of buttons lets you interact with the VOI Group as a unit. Pressing the "Help" button pops up the following menu:
Clicking on the "View" button will pop up an informational menu for the current VOI, similar to the following:
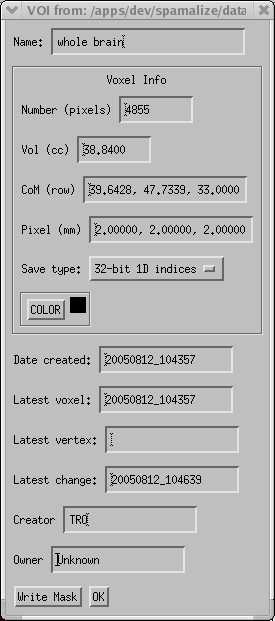
You can edit the following text-boxes: Name, Creator, and (sometimes) Owner. The "COLOR" button is designed to let you associate a particular color with each VOI. This is only moderately helpful, since although the color is saved in the *.voi file, it is not yet possible to display 2 different VOIs with different colors in BrainMaker. (It is on my to-do list...)
Applying a VOI to a file (a.k.a. Extracting VOI information)
You can obtain basic VOI information from the VOI Manager, such as number of voxels, volume, and location (center-of-mass). However, most of the time you will want to "Apply" a VOI to another file. This is a term that indicates extracting the values from an image for every voxel included in a VOI, and calculating the average value of those values. This is frequently used with functional data to calculate the average value in a homogenous tissue region or structure. You can perform this easily from the VOI Manager menu. From the top dropdown menu select, "File: -> Appl". A menu will appear similar to:
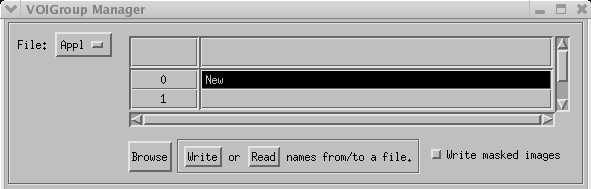
Click on "New" or "Browse" to browse for an image file. You can load multiple files by using the "Shift" and "Control" keys when selecting files in the browser. You can write out a list of "Appl" filenames to a text file, and then later read in the list. This is handy if you have a group of files spread over several directories that you may want to analyze several times.
All of the files must have the same [X,Y,Z] dimensions as the VOI Group. However, 3D as well as 4D files are supported, so you can apply a VOI to a PET or fMRI data series. Click on the "Apply" button in either the VOI or VOI Group rows of the VOI Manager to apply, respectively, either a single VOI or the entire VOI Group to all of the image files listed in the "Appl" menu table.
The normal output of applying a VOI is a text-file containing the VOI average values and a number of other pieces of information, such as the VOI min, max, variance, volume, etc. This information is printed twice to the same file: once organized according to "Apply" file, and a second time organized according to VOI showing frame numbers (for 4D data). A copiuos amount of information is written to each output file, making it easy to retrace your steps and verify what the input files were. The output filename is printed to the screen, and should be the same as what appears in the "File: VOI" text box. If there are file permission problems, BrainMaker will do its best to find a directory where it can write. In any case, the name of the output file is printed to the IDL terminal. (If you are running the free IDL Virtual Machine, you may have to work to create the terminal- see Spamalize installation instructions.)
Click the "Write masked images" to write an image file that contains zeros everywhere except at the VOI voxels, which will contain the image values for each "Apply" file.
VOI Manager Components:
The VOI Manager is written as an IDL Object, called "VOIGroup". This object is primarily designed to interact with BrainMaker's ViewVol object, although it could be used in other applications as well. A VOIGroup is composed of one or more VOIs, and each uses an IDL "VOI" object to represent itself. The VOI objects can only exist inside of a VOIGroup and are not amenable to use by other programs. The VOI Manager is fairly lightweight, as it utilizes pointers to the mask data so data passing requirements are minimized.