BrainSqueezer Image Processing
BrainSqueezer has a suite of tools for image processing. All operations are performed via the GUI, and you can write results to a file at any time. Currently supported options include:
Most of these operations can also be performed using a batch program outside of BrainSqueezer.
Finding the Menus
From the "Menu for" pulldown menu, select "Image Math". Use the "Math Operation" pulldown menu to select a processing operation. The default option is "Image Math", indicated by the "+ - * /" characters.
This menu provides a very versatile set of tools. You can work through a variety of image processing problems, then script the steps in a seperate program once you figure out what you need to do.
The processing operations always act upon the currently designated Object Image. You can direct the fruits of your labor to either the Math Image (deault), to overwrite the current object image, or to create a new image. The latter is useful if you want to do something further to the iamge without destroying the original, since you are not allowed to act upon the Math Image.

The Mathematical Operation pulldown menu lets you select the operation you wish to apply to an image. Use the "value" text box to type the value to apply. For instance, you can subtract the number 3000 from all pixels in an image. The operation you are about to perform is displayed in the text box. Click "Continue, perform operation" to proceed. The precision of the output can be specified as well- the default is a floating point image.
A hidden feature is that you can type an IDL command into the text box to act upon the Object image. (This feature only works with the full version of IDL, not the VM version.) Type a question mark (?) and hit "Return" to obtain a help menu with instructions. You can use any IDL function or procedure as long as "img" only appears once on the right side of the equation. Complex formulations are allowd, such as
img = SQRT( SMOOTH( ALOG(img + 3), 3 ) ) - 4
The remaining buttons let you perform specific operations on the Object image. Most are self-explanatory. The "max" and "min" buttons will find, respectively, the maximum or minimum values in the image. In the case of a tie (several pixels with the same minmal or maximal value), the middle pixel from the list of values encountered will be shown. The number of such values will be printed to the IDL output window. The "lop" button performs the same operation as listed below, but with a fixed upper threshold of 99.95%.
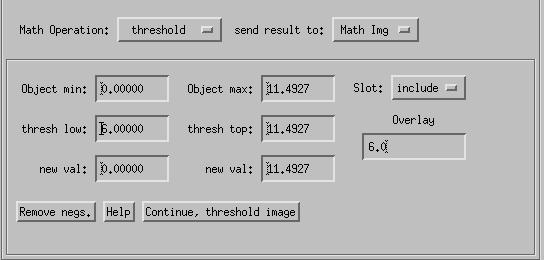
This menu lets you eliminate portions of an image below, above, or between a lower and upper threshold. This is frequently a useful preprocessing step for subequent operations such as coregistration, and can also help to display interesting regions of parametric images such as t-value data. The threshold menu is shown below:

The "Help" button provides instructions for use, reprinted below:
The Threshold module lets you exclude values above and/or below a desired threshold. Alternatively, by changing the "Slot" flag from the default "include" to "exclude", you can exclude the slot of values between the thresholds and instead keep the values above and/or below the thresholds.
The left column refers to lower-level threshold (LLT) and the middle column refers to the upper-level threshold (ULT). The top row shows the minimum (left) and maximum (right) values in the currently selected Object-image. (These two top values cannot be edited).
"thresh low": set this value to the desired lower threshold (inclusive).
"thresh top": set this value to the desired upper threshold (inclusive). The lower and/or upper thresholds will be ignored (or become irrelevant) if set to the lower/upper object min/max (for "Slot: include").
"new val": Set these test-boxes to the value you want to replace the thresholded (removed) values with. For "Slot:include", the box on the left refers to the values below the LLT, and the box on the right refers to the values above the ULT. For "Slot:exclude", the box on the right is inactive, and all values between the two thresholds will be replaced by the "new val" in the left column.
The "Overlay" button lets you type in a lower level threshold value for the Oject image, and display the a binary mask of the pixels above this threshold on the Ref image. This threshold value is not linked to the other threshold values.

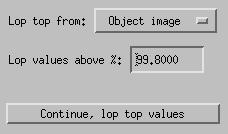
This operation "lops" high values and resets them to a lower value, resulting in an increase in visible bandwidth for the remaining values. This can be quite useful for preprocessing T1 MRI images, where frequently tiny non-brain structures (arteries, nerve fibers, foreign objects, etc.) are much brighter than the brain structures we are normally interested in, making it difficult to see the rest of the brain. The images below demonstrate this. The top row shows the original image, and the bottom row shows the lopped image:

A similar effect results from simply changing the color table so the upper threshold (i.e. what gets shown as white) is lowered. However, lopping actually changes the values of the data, so you don't have to reset the color table every tiome you look at the image. Furthermore, lopping makes for a more uniform distribution of values, akin to a mild version of histogram equalization.
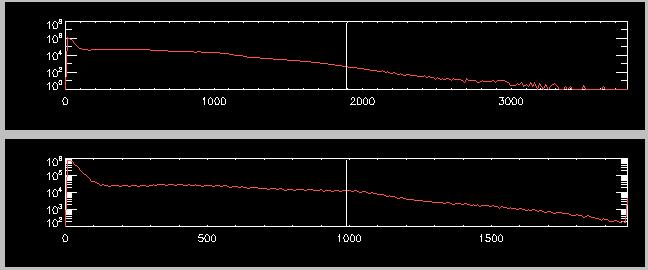
Typically, less than 1% of the pixels can occupy 20%-50% or more of the so-called bandwidth or color table. "Lopping" lets you reset these bright pixels to a value (hopefully) just above the largest values that are truly brain. The histograms below demonstrate this. The top histogram is from the original data, and the bottom histogram shows the lopped data. The highest plausible value for white matter is ~1400.

In the original data, a very small number of pixels (~20) occupy the range from 3000-3800. Similarly, the range from 2000-3500 is occupied by less than 1% of the pixels, and none of these pixels correspond to brain tissue. After lopping, the number of pixels in the highest bin (bottom histogram, on the right) has increased since all of the values higher than this value were placed into it. The lop algorithm finds all pixels with values larger than the value at the Nth percentile of all pixels. The default value is N=99.80. By stating this in terms of a percentile instead of an absolute value it is easy to generalize this procedure to a variety of images, and experience has shown the default value to be pretty good for most T1-MRI data.
You can change the default value if you wish (hit "Return" after making edits). You may also select which image you wish to lop: Object (default), Reference, or All images.
The operations in BrainSqueezer are performed via a user interface, so you have to click on a button to do anything. This is handy for figuring out an initial good approach, but eventually you may want to implement a more automated method to deal with a large number of similar images. The Spamalize program "spam_batch_filter.pro" was written to facilitate this. This program currently supports a few filtering operations (median filter, scaling, etc.). The program takes care of all of the file reading and writing, and makes it easy to add your own operations.
This program provides a framework for selecting files to operate on, performing an operation on them, and creating output filenames for each file. You may add additional filters/operations to this program, or you may use this program as a template for writing your own more focused program. The steps you need to pay attention to include: