Setting up your first GUI (or "widget") in IDL can be frustrating, so there are several examples here of increasing complexity to help you out.
Image display in IDL can be done using the standard graphics mode, or IDL's fancy new Object Graphics. Object graphics provides support for advanced graphics techniques like 3-dimensional rendering, varying the opacity of objects, and building up complex images. Most of this can be accomplished within standard graphics using the Z-buffer, but once you write your first Object-Graphics program you will never go back! (Well, almost never; standard graphics are still appropriate in many situations.) Object graphics are trickier to set up, but much more versatile and expandable than standard graphics.
A very helpful GUI programming techniqe in IDL is what is termed "compound widgets". This is a technique to let you write widgets that you want to plug into other larger widgets and use over and over. An example is a text-entry box that has up- and down-arrows to easily increment/decrement the value of a number in the box. The trick is how to create this beast so it is independent of other simultaneous instances of itself. A couple of examples of compound widgets are provided, together with a discussion of some of the nuances of building them.
IDL ProgrammingThis page contains links to several tutorials for programming in IDL. There is an introductory IDL tutorial avaialble, but if you are new to IDL you should peruse the IDL manual or one of the excellent books mentioned below.
Tutorials are available for:
There are a few books on IDL programming which I have found very useful. The IDL reference manuals are quite helpful if you already have some idea of what you need. The reference manuals contain a few examples for beginners, but the first book I would recommend reading is:
"IDL Programming Techniques" by David Fanning. It has a lot of examples and is a great book!
Another excellent book is:
"Application Development with IDL" by Ron Kling. This is a somewhat more advanced book, but also has some very nice example programs that are quite useful for image analysis. I have copies of both of these books if you want to borrow them (and you work in my lab!), or you can purchase them through RSI (makers of IDL).
IDL tutorial: Just the basics.
IDL is a structured programming language that provides a complete environment for image processing. It has basic flow-control operators like if, while, and for, it supports pointers, structures, and arrays, has a vast number of built-in library functions, supports object-oriented programming, and provides a convenient image display interface. On top of that, there is a widget-builder to create complex GUIs, "Live Tools" that let you create and edit graphs and images on-the-fly, and Object Graphics which support modern complex 3D graphics displays.
The IDL language is most similar to Matlab (one of its competitors), but is also similar to Pascal and in some respects to C in structure. IDL is fundamentally an array processor; it wants to work with arrays or groups of numbers. There are many built-in routines to facilitate this; several are variations of the Numerical Recipes programs. Examples of some of the basic control elements are:
if (a GE 2) then begin
...
endif
while (string EQ 'filename') do begin
...
endwhile
for i=0, 99 do begin
...
endfor
There are variations on all of these, such as "if - then - else", a CASE structure, and allowing the counter in a for loop to decrement, but the three examples above are the elements I use for 90% of my programming. All of these elements can be nested within one another.
IDL is a zero-index language; that is, the first element in an array has index number "0" (zero). The last element thus has an index number of (N-1). This is similar to C, but different than Matlab, which indexes from 1-N. I mention this here because in a 0-index language, you generally run a for-loop index from 0 to (N-1).
Optimizing IDL performance.
IDL really shines when it can work on a large array (like a 2D or 3D image). It's performance suffers when it has to examine individual array elements one at a time, as when you have a for-loop to step through an array one element at a time. There are a host of methods for avoiding a for-loop that are beyond the scope of this brief tutorial. Suffice it to say that with good programming technique, IDL approaches the performance of compiled C for most number-crunching tasks.
A simple IDL program:
A basic IDL program looks like:
PRO hello, name
print, 'Hello, '+STRING(name)
END
That's it. "PRO" declares that this is a procedure that performs a task, as opposed to a function that performs a task and also returns a value. "hello" is the name of the program. "name" is the label assigned to an input parameter. The only thing this program does is print a message. "END" indicates where this program ends. To run the program, type:
IDL> hello, Terry
The program will print the message:
IDL> Hello, Terry
IDL Compiles at Run-Time.
This is a good time to talk about the fact that IDL does not normally run a precompiled program. (Although it can- this is confusingly called Run-Time mode.). The source-code is a normal text file that is read and compiled as each particular program is encountered in the calling program. This approach has several ramifications:
IDL has a gentle but long learning curve. I don't know an IDL programmer that considers themselves to have mastered IDL! If you want more information, refer to one of the training manuals.
One of the great things about IDL is its excellent support for Graphical User Interfaces (GUIs) through its "widget" family. A widget is an atomic element of a GUI. Various types of widgets combine to make a GUI. The major widget types include:
Following is an example of the simplest possible GUI. It is a small button that reads "Continue". The purpose of this GUI is to halt the flow of another IDL program, letting you inspect results which would otherwise fly by too fast. Pressing the button causes the GUI to destroy itself, and the calling program can then proceed.
PRO SPW_CONTINUE
;***create base***
cont_base = WIDGET_BASE(TITLE='Click to Continue:', /FRAME)
;***create button:***
continue_but= WIDGET_BUTTON(cont_base, /FRAME,$
VALUE=' CONTINUE ',UVALUE='CONT_CONT')
;***Realize the menu
WIDGET_CONTROL, cont_base, /REALIZE
;*** Wait for the first event: ***
event=WIDGET_EVENT(cont_base)
;*** Destroy the GUI, let caller program proceed: ***
WIDGET_CONTROL, cont_base, /DESTROY
END
Notice that this program can only respond to a single event. (An event is generated every time you press a button or perform any other allowed action within a GUI.) It is somwhere between painful and impossible to use an approach like this to process multiple events, for example letting the user select several options for image display and then display an image. If you intend to have multiple events (and any GUI worth its salt will) you will want to create an event processor. This is simply a program that collects all of the possible events from your GUI and decides what to do with them. By having this occur in a seperate program, you can call the program every time an event is generated!
There are two things you need to do when creating a GUI with an associated event-processing program:
1) Tell IDL that it needs to manage events generated by your GUI, and
2) Tell IDL where to send these events.
Within IDL, events are gathered transparently by the XMANAGER program, which then looks for the associated event-handler and sends the events to it. The event-handler is usually included in the same file as the GUI creation program. Because of how IDL compiles programs, the GUI creation program must be the last program in the file, so all preceding programs will get compiled. I mention this because it seems strange to most people when they don't see the GUI program until they get to the end of the file. The rule that IDL uses to search for event-handlers is the following: if you have a GUI creator "my_prog", it will search for a program named "my_prog_event". Following is an example of SPW_CONTINUE with an event-handler:
----------------------------------------------------
PRO SPW_CONTINUE_EVENT, event
;*** Determine which button sent the event:***
WIDGET_CONTROL,event.id,GET_UVALUE=uval
CASE uval OF
'CONT':BEGIN
;*** Destroy the GUI, let caller program proceed: ***
WIDGET_CONTROL, cont_base, /DESTROY
END
ELSE:RETURN
ENDCASE
END
---------------------------------------------------
PRO SPW_CONTINUE
;***create base***
cont_base = WIDGET_BASE(TITLE='Click to Continue:', /FRAME)
;***create button:***
continue_but= WIDGET_BUTTON(cont_base, /FRAME,$
VALUE=' CONTINUE ',UVALUE='CONT')
;***Realize the menu
WIDGET_CONTROL, cont_base, /REALIZE
;*** Register the GUI (Hand control to X-Manager):***
XMANAGER, 'spw_continue', cont_base
END
Since we have only a single button, it is pretty simple to deduce where the event came from. As soon as we get two buttons, however, we must have a way of telling them apart. The standard way to do this is through the "UVALUE" which is a value associated with each component widget. Every widget (button, slider, base, etc.) can have a UVALUE. Furthermore, the UVALUE can be anything you want it to be- a string, a number, a structure, even an image! In this example, the UVALUE is a string ("CONT") and is case-sensitive. Later, when we look at compund widgets, we'll see some examples of putting more exotic things into the UVALUE, but for now we can assume that all UVALUEs are strings that uniquely identify a widget within a GUI.
When we register "spw_continue" with XMANAGER, it looks for a program named "spw_continue_event". When an event occurs, XMANAGER passes an event structure to the event-handler, which in turn must decide what to do with it. The example above contains everything you need to include to have a fully-functional GUI. More complicated GUIs just have more buttons and other options, but the mechanism for how any widget event works is the same!
Following is a more complicated GUI.
(I haven't found a simple enough one that I like yet... Watch this space!)
There are two main types of programs in Spamalize:
1) Mature programs that perform an image analysis or display task, like BrainMaker or BrainSpinner;
2) All the others, that let you take a more modular approach to image processing.
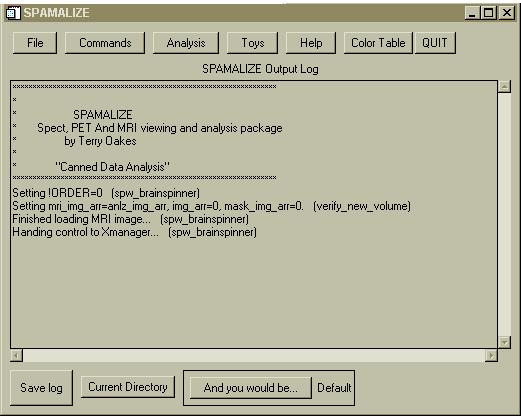
This section concentrates on the latter, since there are already web-pages devoted to most of the more mature self-standing programs. All of the programs are accessed through the main menu, which looks like this:
The first five buttons are pull-down menus. (For more information on the menu features and how to use them, see the Spamalize MainMenu page.) If you add a new program, edit SPW_MAINMENU.PRO to add the program to the menu. You will need to add a new label to the menu, and also make sure to add a new call for your program in the event-handler.
The basic idea behind Spamalize is that you can read image data into a single array, store it in memory, and do things to it. Things like display, drawing, scaling, flipping, writing, etc. The image data are stored in an array called (drum roll, please) "img_arr". Whenever you read in a new image file, it gets stored there. When you write an image file, it is the contents of "img_arr" that get written.When you flip your data left/write... well, you get the idea. All of the Spamalize programs can access "img_arr" through a common variable structure. (For non-IDL'ers, this is a type of global environment variable.)
Read Menus
There are a number of image-read programs, all of which funnel the image data into "img_arr". The general read process can be seen in a diagram. Most of these steps are transparent or at least ignorable to the user. The top-level read program looks like:
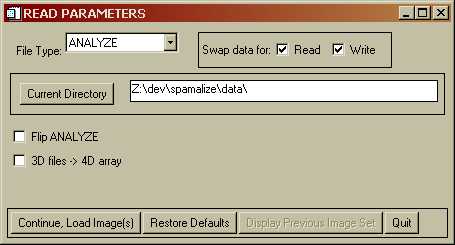
You may select an alternate file type from the dropdown menu in the upper left. Context-sensitive options will appear. For instance, the GE/Advance PET menu looks like:

Clicking on "Continue, Load Image(s)" pops up a browser that lets you select an image file. Depending on the type of image, a menu may pop up to let you select which images you want to load. The menu for PET multi-plane, multi-frame image set will look like:
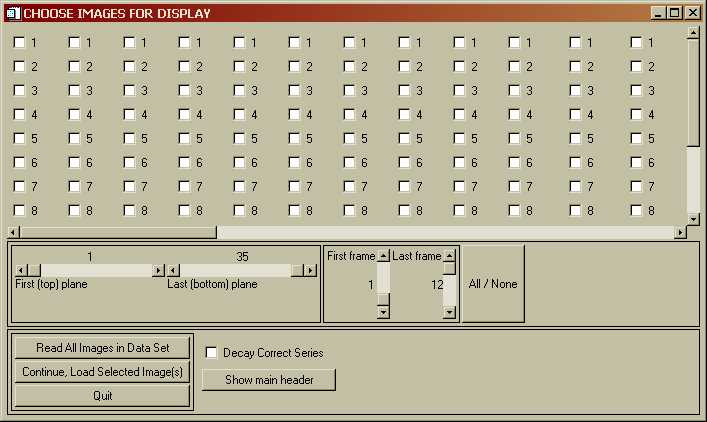
Every image in the data set is represented by a check-box. You can select (or unselect) any combination of images. The sliders in the center of the menu let you quickly select a range of images. When yo select one or more images, their check-boxes get filled in. To load all of the images, simply click "Read All Images in Data Set". If you move the check-box-window-sliders, you can see all of the check-boxes, as well as boxes that let you select a single plane or frame, as shown in the following menu:
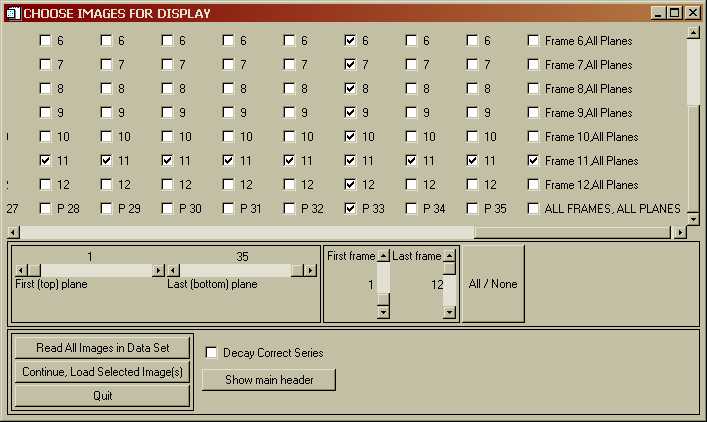
Here, I selected "P33", which then selected all of the images in plane 33, and "Frame 11, All Planes" which selected all the images in Frame 11. Unselecting works the same way. If you do several iterations, eventually the GUI will get confused and you will have to start over... Click "Continue, Load Selected Images" to load in the desired images. When you want to display, write, print, etc. the images, you will get a menu that looks similar to the Read menu above, but only the images you loaded will be sensitive, i.e. you will not be allowed to do anything with unloaded images.
Image data storage
There are associated common variables that contain main-header information for the entire image array (X,Y,Z dimensions, pixel dimensions, etc.) and also information for each image slice in a sub-header structure, such as time of acquisition, number of counts, etc. These common variables are cleverly called "main_header" and "sub_header".
Since Spamalize was originally written for PET, "img_arr" is oriented toward storing multi-time-frame or dynamic data. On earlier PET systems there would not infrequently be planes or frames that were garbage, so "img_arr" is designed as a collection of 2D slices rather than as a 3D or 4D array. To access a particular slice, you need to interogate "sub_header" to figure out which slice-number in "img_arr" corresponds to the desired plane and frame. One nice result of this scheme is that missing slices do not interfere with the display or storage of images.
A big downfall of this scheme is that it is difficult to extract orthogonal views. There are two ways to get around this in Spamalize. The first is to just declare "img_arr" to be a 3D array, and take your lumps. Because of the way IDL stores arrays and how the image data get read in, frequently you will never notice a problem. Problems will show up first as an inability to display an image using the general "Display" tools if you take this approach. A second technique is just to shift the data to another array that is designed to be 3D (or 4D) from the get-go. In Spamalize, this array is called "anlz_img_arr". Spamalize internally keeps track of whether "img_arr" or "anlz_img_arr" is active, and for the most part knows how to display, write, etc. the appropriate one. However, I should mention that keeping track of this has caused more hair to be pulled out than any other aspect of Spamalize. For most modern applications using "good" data with no missing planes, I would advise using a 3D array such as "anlz_img_arr", which is how most of my recent programs work. Notable exceptions are the FDG Quantitation tool and the Patlak/Logan-plot Tool, both of which are oriented toward PET and continue to use "img_arr".
There are a number of programs that funnel the image data and header-values into the correct place. The program "SPAM_READ_ANLZ" is a good example that uses all of these programs, most of which are related to making sure the data are scaled properly, header values go to the right place, and missing header values get reasonable estimates.
Spamalize programs
A more-or-less comprehensive index of Spamalize programs is in the file .../spamalize/install_spam/catalogue_of_spam. The programs are organized by functionality (read, write, utilities, etc.) with a one or two-line description of each program. When I vaguely remember that I may have written a program similar to the one that I am about to embark on, I search in this catalogue to see if there is a good template there.
Most of the Spamalize "worker" programs can be called outside of the context of their GUI. In particular, programs that perform a particular task like file reading, image filtering, etc. are designed to be called from within many programs. To avoid the complexity introduced by IDL's common variables, most of these programs have the necessary parameters passed via KEYWORDS. This is an IDL technique for passing parameters where the order of the parameter does not matter. The syntax is simple: include a statement in the program call like "FILENAME='C:\myfile.img'". You need to know what the name of the keyword is, and what its appropriate values are. This is usually contained in the top comment-section of a program. (See the IDL documentation for more details on Keywords.) Furthermore, most of worker programs that you would want to run in batch mode avoid asking the user for any information which would interupt the flow of the program. This means that there must be a lot of parameter and error checking, and some way to make good guesses for missing data...
As I mentioned earlier, the two main types of Spamalize programs are GUIs and workers. There is a third type, an "auxiliary" program, that are not as Spamalize-specific as the others. These are usualy small programs that do a particular task, and are amenable to being used outside of the Spamalize environment. They live in .../spamalize/src/aux_progs/.
A partial list of some of the more useful programs includes:
There are two major avenues for image display in IDL: standard and Object Graphics. There are some robust and complicated examples of Object Graphics in BrainSpinner (SPW_BRAINSPINNER.PRO) and in my ViewSlice image display program. Here I will concentrate on the more basic standard image display. I have another page about IDL's Objects.
Standard image display uses 256 colors. An image must be scaled from 0-255, and each value is assigned a color. The value/color association is known as a Color Table. There are about 40 color tables that come loaded with IDL, and I have made another 20 or so for particular applications. The color table relates a particular value (e.g. 210) with a RGB triplet (e.g. [255, 0, 0] = red). To display an image using the standard or indexed color system, the image must consist of values ranging from 0-255 in order to provide a correspondence with the current color table. Any image can be scaled so that it has a minumum value of zero (0) and a maximum value of 255, using IDL's BYTSCL function:
img_scaled = BYTSCL(img)
Displaying the image is simple:
TV, img
This creates a window on the screen and magically displays the image. I say "magically", because there is a lot of X-windows type of machinations that you the user never ever have to worry about! An even simpler approach is to just say:
TVSCL, img
which incorporates both scaling and display. I usually use the two-step approach as it gives me better control over how the image is scaled. This is important if you want to have an image with lines drawn over it, for instance. You need to store the color of the line in one of the 256 color table slots, leaving only 255 (not 256) colors for the image. If you scale your image from 0-255, the top value will be the same color as your line. If instead you scale your image from 0-254, you can reserve the top color index (255) for a specific color for e.g. a line. This sounds a little complex (and can be!) but is actually quite straightforward to implement.
A compound widget is a way of encapsulating each instantiation of a program so that changes made to one instance do not affect other instances. IDL comes with several compound widgets; the one I use the most is CW_FIELD, which lets you enter text or numbers into a text-box (field) and provides a title and more importantly an event-handler for each instance of CW_FIELD. The advantage is that your code becomes much more compact; rather than have to paste in several lines for an event-handler, you can have a single line that just gathers the value. There are other lines of code within CW_FIELD that make sure the user entered the correct type (text, integer, etc) for the desired variable, but you don't have to worry about this.
I wrote a modified version of CW_FIELD that includes a pair of Up/Down arrows. It looks like:
![]()
The title is "dim", the value is "3". This particular instance is used to change the dimension of a filter. By clicking on the arrows, you can change the value of the number in the text-box by a set amount. It is frequently handier to click on the arrows than to enter a new number and press "Return", especially if you are incrementing or decrementing the value by 1. You can also see the source code for CW_FIELD_ARROWS if you like.
What makes compound widgets different from a standard program is that they store their "state" information in the UVALUE of one of the widgets. The "state" information can contain variables of interest to the GUI, such as the displayed number, widget IDs, flags, min/max values, etc. By storing it this way, instead of in a "common" variable or a file, each compound widget can maintain its own value without affecting other sibling compound widgets. Also, widget cleanup is easy- when you destroy the compound widget, all of its stored variables (should) get destroyed as well, freeing up memory.
The clever part is to store the state information as a structure into the UVALUE of a widget that does not normally return events, such as a label or base widget. If you use the UVALUE of the compound widget's top-level base, you will run into problems because the calling program may want to store something there, such as its own identifying string. Therefore, the state info is typically stored in the first child widget of the top-level base. You can almost always make sure that this is a base widget.
Another great thing about compound widgets is that you can embed one compound widget into another. In fact, I simply embedded CW_FIELD into CW_FIELD_ARROWS, so the only thing I have to worry about is handling events for the arrows, and passing the new value back to the caller. You can easily (?!) build up a complex compound widget of your own that is composed of multiple constituent compound widgets.
I wrote another compound widget that lets you pick a color. It displays the flat color, and can optionally display the color rendered on a 3D sphere, so you can judge if it is just right for your cool 3D brain display. You can click on any one of the 24 pre-selected colors, or move the sliders to get just the right shade of flesh-tone. It looks like this:
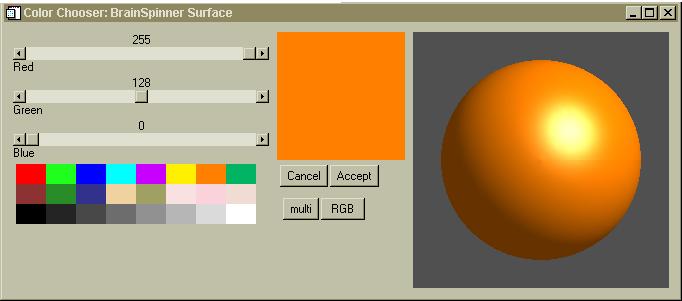
This is a more complicated example of a compound widget, not only because it has images and more options, but because of how it is called. A standard compound widget is embedded into another program, and resides within a widget hierarchy. The color chooser is designed to pop up as an independent widget when you click a button, in order to save space on the menu. However, this makes it somewhat problematic to return events from the compound widget. I solved this problem by having the compound widget return events to the same event-handler as the widget-button that calls it via SEND_EVENT, and using the following code to differentiate between a "Create widget" event and a "Returned color" event (the UVALUE of the button is 'SURFACE_COLOR_CHOOSER') in the event-handler:
'SURFACE_COLOR_CHOOSER':BEGIN
if (N_TAGS(event) LE 5) then begin
;* event was a button press- show the menu: *
res=CW_COLOR_CHOOSER(event, COLOR_VECTOR=br3d.p.col.surf, /RAMPED, /THREE_D, $
TITLE='Color Chooser: BrainSpinner Surface')
RETURN
endif else begin
;* event was sent from CW_COLOR_CHOOSER- update the color: *
if (event.update EQ 2) then begin
br3d.p.col.surf = [event.r, event.g, event.b]
UPDATE_SURFACE_COLOR
endif else RETURN
endelse
END
It's ugly but it works.