Functional Image Preprocessor (FIP) V1.0 Users Manual
by Aaron Olson Last Updated February 15, 2001
Preface
Everything in this manual is intended to be accurate at the time of writing (date above). In all likelihood FIP will be rapidly evolving and gaining functionality. As a result, certain information in this packet maybe inaccurate and/or incomplete at the time of reading.
Its expected that the user of this manual will have at least a vague understanding of what he/she is doing, why they are doing it, and how it’s done (e.g. where experimental data is stored, what a reference file is and why it is important, etc.).
The online help (also in Appendix A) provides additional valuable information.
Table of Contents
Conventions Used in this Manual
Appendix A: FIP’s front panel fields
Conventions Used in this Manual
Boldface Italics -- denotes exact text that is typed into the
computer
Purpose
FIP’s purpose is to provide a user-friendly tool that will allow researchers to efficiently begin to process functional magnetic resonance imaging (fMRI) data in an organized way. Here is list of features that FIP offers:
1. FIP uses a
Graphical User Interface (or GUI pronounced “gooey”). A GUI allows for “point & click conveniences” and easy
editing.
2. FIP provides a consistent yet flexible and configurable
interface that will allow it to be used for a variety of imaging protocols.
3. FIP stores all of its actions in hopefully easy to
understand text based log files.
4. FIP performs a copious amount of error checking and if an
error does occur, FIP’s built-in logging mechanisms should make it much easier
to track down the error’s source.
5. FIP is written in a popular scripting language called perl
which is very powerful and portable across platforms. FIP is currently capable of running on Sun, SGI, and Linux
platforms*.
*NOTE: Although FIP
is capable of running under Linux, “epirecon” the work-horse data processor it
uses to do the actual reconstruction is not – hopefully this will change soon!
FIP also has the capability to operate in a less user-friendly batch-mode (see Aaron for additional information on that).
How FIP Works
Currently, FIP’s main processing functionality is p-file reconstruction. It performs reconstruction on a subject specific basis following detailed instructions given in what’s called a Subject Information File (SIF). An example SIF is shown below: (don’t spend time examining it closely)
#
/da/exp/depall/MRI/now/08.09.00/H1L1/test/depall_039.SIF
#
# Created via
/local/progs/mri/sun/scripts/fip by olson on Mon Feb 12 13:52:44 2001
Subject identifier = 039
run_1 Pfile =
/da/exp/depall/MRI/08.09.00/E418/raw/P12800.7
SIF template = depall.SIT
Reconstruction filter =
Hamming
run_2 Pfile =
/da/exp/depall/MRI/08.09.00/E418/raw/P13312.7
Study identifier = depall
Working directory =
/da/exp/depall/MRI/now/08.09.00/H1L1/test
Reconstructed files to create
= SDT
ZX = NA
ZY = NA
run_3 Pfile =
/da/exp/depall/MRI/08.09.00/E418/raw/P13824.7.gz
Pre-images to discard = 5
Apply BP asymm correction = Y
Scaling factor = 138
Reference filename =
/da/exp/depall/MRI/08.09.00/E418/raw/ref.dat.039
SIF log filename =
History = ******** SIF written to by
/local/progs/mri/sun/scripts/fip Mon Feb 12 13:52:44 2001 by username:olson on
host:LAN103. The current directory was
/d8b/olson/projects/sif/ex_subject2 ********
The SIF contains all the pertinent information needed to reconstruct the data collected from a specific subject. The user only needs to input a small portion of this information.
So, how does the user create a SIF? A good way to explain this might be via example. Try following along with the steps given below (i.e. do them too!)
1) Log on to lan103 or lan104.
2) Type setenv DISPLAY lanXXX:0.0 where you replace the X’s with the appropriate number corresponding to the machine you’re working on.
3) Open another window (this can be done by typing xterm &). This new window will be referred to as “FIP’s Console Window” or just “console” for simplicity (you can actually make the window have this name by typing xterm -name "FIP's Console Window" & )
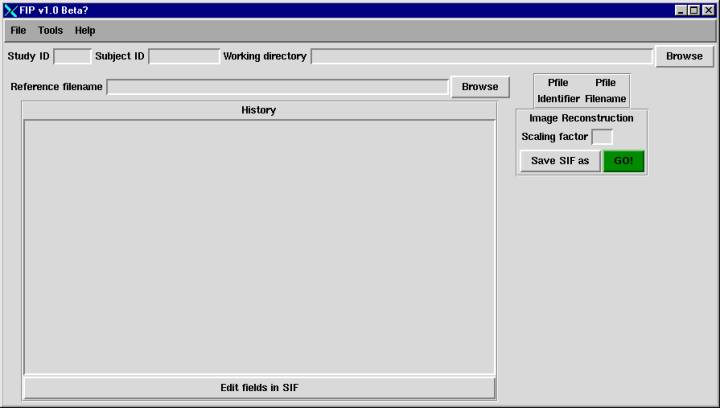
4) Now type fip in the console to “launch” the program. You should see a window resembling the one below appear (it may take a few seconds). This will be referred to as the “FIP application window” or just “FIP.” An explanation of all the fields shown can be found in the online help and in Appendix A.
5) Click on the word “File” on the horizontal “menu bar” near the top of the window and select the “new” option. A “dialog box” resembling the one below should appear. It contains the available Subject Information Templates (SITs). There should be one SIT corresponding to the study (e.g. depall) for which you wish to process data.
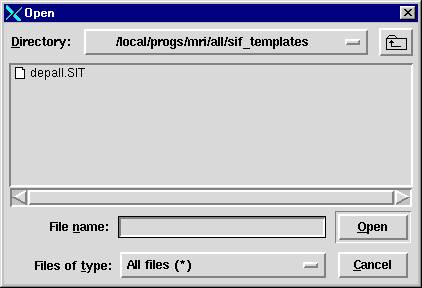
6) In this example, our only option is “depall” – so we’ll select it!
7) You should see information appear in FIP. This is information that was in the SIT.
8) Ok, now FIP is ready to get information from you. Going from the upper-left-hand corner and traversing across and then down (i.e. like reading) the first “field” is “Study ID.” This should already be filled in with the study name (e.g. depall). Next is “Subject ID.” Normally you would type in the appropriate subject number here, but we’ll type 999 since it is a test example.
9) Next is the “Working Directory” field which defines the directory (dir) where results of the data processing will be stored. There are several ways you can enter the working dir. You can “cut-n-paste” the dir from another window. You can type in the path by hand, or you can browse for it (or a combination of these). If you enter a dir that doesn’t exist, FIP will attempt to create that dir for you during the reconstruction process. In this example, We’ll choose to browse for it, so click on the browse button to the right of the corresponding “entry box.” A “Directory Select” dialog box should “pop-up” resembling the one below.
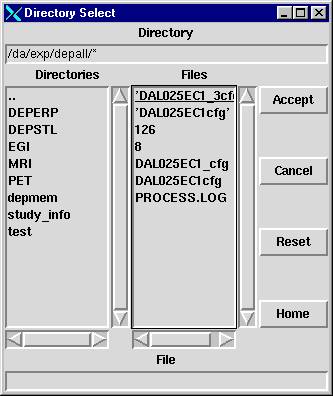
10)Your current dir (‘/da/exp/depall/’ in this example) is displayed at the top under “Directory.” The available sub-directories are listed under “Directories.” The “..” represents the parent dir (/da/exp in this example). You can navigate through the dir structure by double clicking on these sub-directories. Once you find your desired working dir, select it by clicking on it once and then click the “Accept” button. For this example, I double-clicked on “MRI” then had to use the “scroll bar” to scroll down to find and double-click “now.” Then double-clicked on “13.13.13” and finally single-clicked “H1L1” and clicked “Accept.” The “Files” portion of this box, can be ignored because we are interested in choosing a dir not a file (it will not let you choose a file). The “Reset” button goes to the dir where FIP was started (i.e. executed). The “Home” buttons goes to your home dir (i.e. dir you are at immediately after login). Both of these buttons can be useful, don’t be afraid to play around use them. If you ever want to undo the dir traversing you have done or just want to start over, click the “Cancel” button.
11)The next field is “Reference filename.” This works similar to the “Working directory” field except if you click “browse” you’re now given an “Open dialog box” (as shown below).
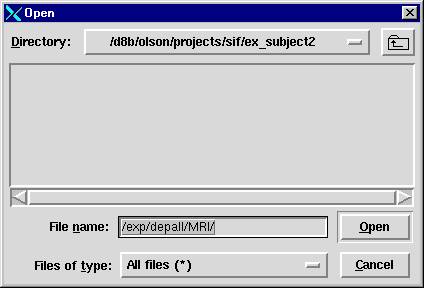
12)Clicking “Open” in this box will take you to the directory highlighted in the “File name” field (/exp/depall/MRI in this example). From there you navigate by double clicking in directories denoted by folders or by using the up directory icon in the upper-right-hand corner of the box. You navigate to the location of your reference file and double-click to select it (or single-click and click “Open”). In this example the reference file-path is /da/exp/depall/MRI/13.13.13/E1480/raw/ref.dat.039.
13)The next step is to choose the correct “Pfile Filenames” corresponding to the appropriate “Pfile Identifier” (run_1, run_2, run_3 in this case). The number of runs is determined by the setting in the SIF which is ultimately determined by the SIT. P-files are the actual data files you wish to reconstruct. The procedure for selecting p-files is the same as that for the reference filename in steps 10 and 11 above.
Note: After browsing for a p-file, the beginning of the p-file’s path (e.g. /da/exp/depall..) is displayed in the corresponding entry box. To see the actual name of the p-file chosen, simply click on the entry box and hit the “end” key on your keyboard, or traverse to the end of the text using your arrow keys.
14)Next you will want to choose a “Scaling Factor” by clicking the corresponding entry box and typing in a value of your choice. The scaling factor affects the range of voxel/pixel values assigned to the reconstructed images (or image volume). As the scaling factor is increased, the pixel/voxel values decrease.
15)The last step before reconstruction is to always save the SIF . There are 2 possible ways to save. First, if this is a previously created SIF you may want to use the “Save” option under “File” on the menu-bar. Your other choice is “Save as” which can also be found under the “File” menu or can be done by clicking the “Save SIF as” button under “Scaling factor.” Either of these latter 2 choices will allow you to select a location and a name for the new SIF you’ve just created (for this example the chosen file-path was /exp/depall/MRI/now/13.13.13/H1L1/depall_999.SIF). After the file is saved, you will see information appear under History in FIP. This is an internal form of record keeping and is not editable.
Important Note: The SIF must
always have a ‘.SIF’ extension at the end of the filename.
16)Normally, you would perform the reconstruction now, but since this is a learning exercise we would like to demonstrate one more thing. Click the large “Edit fields in SIF” button underneath the History text box. This will cause a window to pop-up resembling the one below:
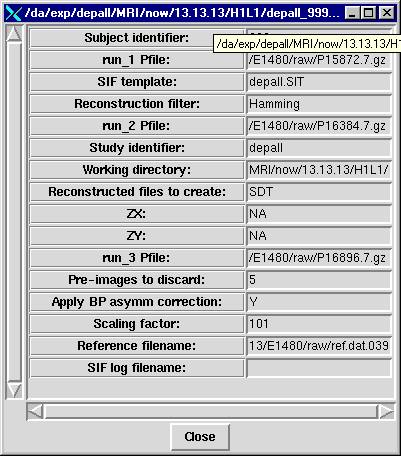
This contains all the information found in the SIF (except History) and allows the user to edit it. Ask your “local expert” if you are curious about the different fields. Note the blank “SIF log filename” field at the bottom. You can place a filename here if you wish, but it’s recommended that you don’t. Leaving this field blank causes FIP to automatically choose a logical filename for you.
17)Ok! Finally, we’re now ready to reconstruct. Having worked your way down and to the right, simply click the green “GO!” button in the “Image Reconstruction” frame. A message box will pop-up asking if you’ve saved the current SIF and verifying that you really want to reconstruct. If you do, then click “Ok.” Doing so should cause much text to be output to the FIP console window (verify that). Depending on the reconstruction procedure you’ve been instructed to follow, you may be asked to monitor some of this information and take appropriate action based on its contents.
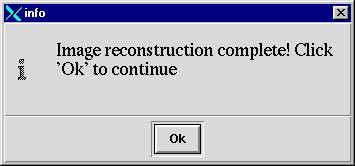
18) When the reconstruction is finished (can take hours) another dialog box will “pop-up” informing you it’s done. 2 basic types of messages can appear in this box. The first is good news and resembles the following:
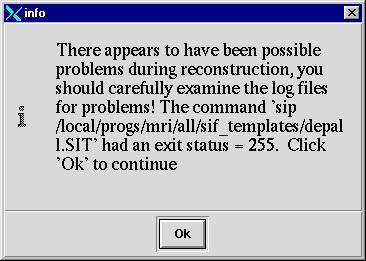
The second is potentially not good news and will somewhat resemble the following: (this particular problem happened when someone forgot to save the SIF first)
19)The next thing you should do regardless of the message you receive is examine the log file that was produced. You can do this using the “View Log” option under the “Tools” menu from the menu-bar. The file-path for the log file is given under “History” or can be seen using the “Edit fields in SIF” button.
20)That’s it for the lesson. When you’re ready to exit choose “exit” under the File menu from the menu-bar! Enjoy!
I welcome any comments/suggestions/constructive criticism etc. about this manual or about FIP itself.
Aaron Olson
Appendix A: FIP’s front panel fields
Below is a brief explanation of the fields found in FIP’s “front-panel.” This information is also contained in FIP's online help.
Study ID -- Study Identifier (e.g. depall)
Subject ID -- Subject Identifier (e.g. 012)
Working Directory -- Directory (dir.) where you wish the processing to be done (e.g. /da/exp/depall/MRI/now/08.09.00/H1L1 ). Subdirectories and other files will be placed here. These files will require large amounts of available disk space (e.g. 100s of Mega-Bytes (MBs) ). You must have write-permission for the selected directory. Note: when using the browse button, you must select (i.e. highlight) a dir. name and click "accept" to choose that dir.
Reference Filename - A file created by the MRI scanner used in reconstruction (e.g. /da/exp/depall/MRI/08.09.00/E418/raw/ref.dat.039 ). Use the browse button to save typing or to search.
Pfile Filename - place the pathname of the p-files you want to reconstruct here (e.g. /da/exp/depall/MRI/08.09.00/E418/raw/P13312.7.gz)
History - A text-box where information will appear indicating action that has been taken. Information here can NOT be edited.
Edit fields in SIF button - Allows user to edit more fields in the SIF than can be accessed from the simplified "front-panel" (e.g. SIF log filename, Reconstruction filter to use, etc.)
Scaling Factor - Allows user to change the scaling factor used during reconstruction. The scaling factor affects the range of voxel/pixel values assigned to the reconstructed images (or image volume). As the scaling factor is increased, the pixel/voxel values decrease.
Save SIF as - Allows user to save SIF conveniently - this is convenient because it's a requirement before being able to properly reconstruct (i.e. do it before clicking the "GO!" button).
Data Reconstruction Flowchart